
Bible
Art Journaling 101
Week One
- There is no “right” or “wrong” way to do this!
- This is self-paced. By the end of our class you should have completed 3 verses in your Bible. Some will create more but everyone should be able to finish 3 verses.
- If you are one of those that thinks, “I am not that creative I am not sure I can do this” I say, “YOU CAN!” This process is about you creating something meaningful to you. Let it be an expression of your love for God.
·
When selecting a verse to work on, I
suggest holding off on your treasured verses until you gain some experience and
develop your own style.
How
do you develop your own style and gain experience?
Begin searching for examples that
appeal to you. You may like the lettering in one example, the colors used in
another, or you may like a drawing in still another –all of these can be used
for inspiration. If you like it, save it. I have a pin board (on Pinterest)
that I use to keep all of my inspiration in one place.
Experiment with your own
writing:
BLOCK STYLE
all lowercase
playful loopy style
s t r e t c h e d
Tall & Thin
S p a c e d
·
Use a pencil until you have it the
way you want it to look. You will use your eraser.
·
Practice on scratch paper or graph
paper (this is what I prefer) first. After a few verses this may not be needed.
Using graph paper is
helpful for a number of reasons. I use it because I can sketch out my space and
then lay out the words in a way that is pleasing. I often erase several times
before I get it looking the way I want. Once I have something I am happy with,
I can use the grid and my ruler to lay it out in my Bible. Each square on the
graph paper is ¼”. By using the grid I can figure out how much space each line
of the verse design will need. I can then make little guide marks to help
transfer the design from paper to Bible

The above picture shows my two verses sketched on graph paper

The above picture shows what I sketched into my Bible.

The measurement (vertically) is ¾” for the
word “stand”, ¾” for the word “still”, and 1” for the word “Jordan”.

The orange circles in the picture on the right
show my tick marks for the vertical measure for each word.
All of the marks are erased
before the final color is added.
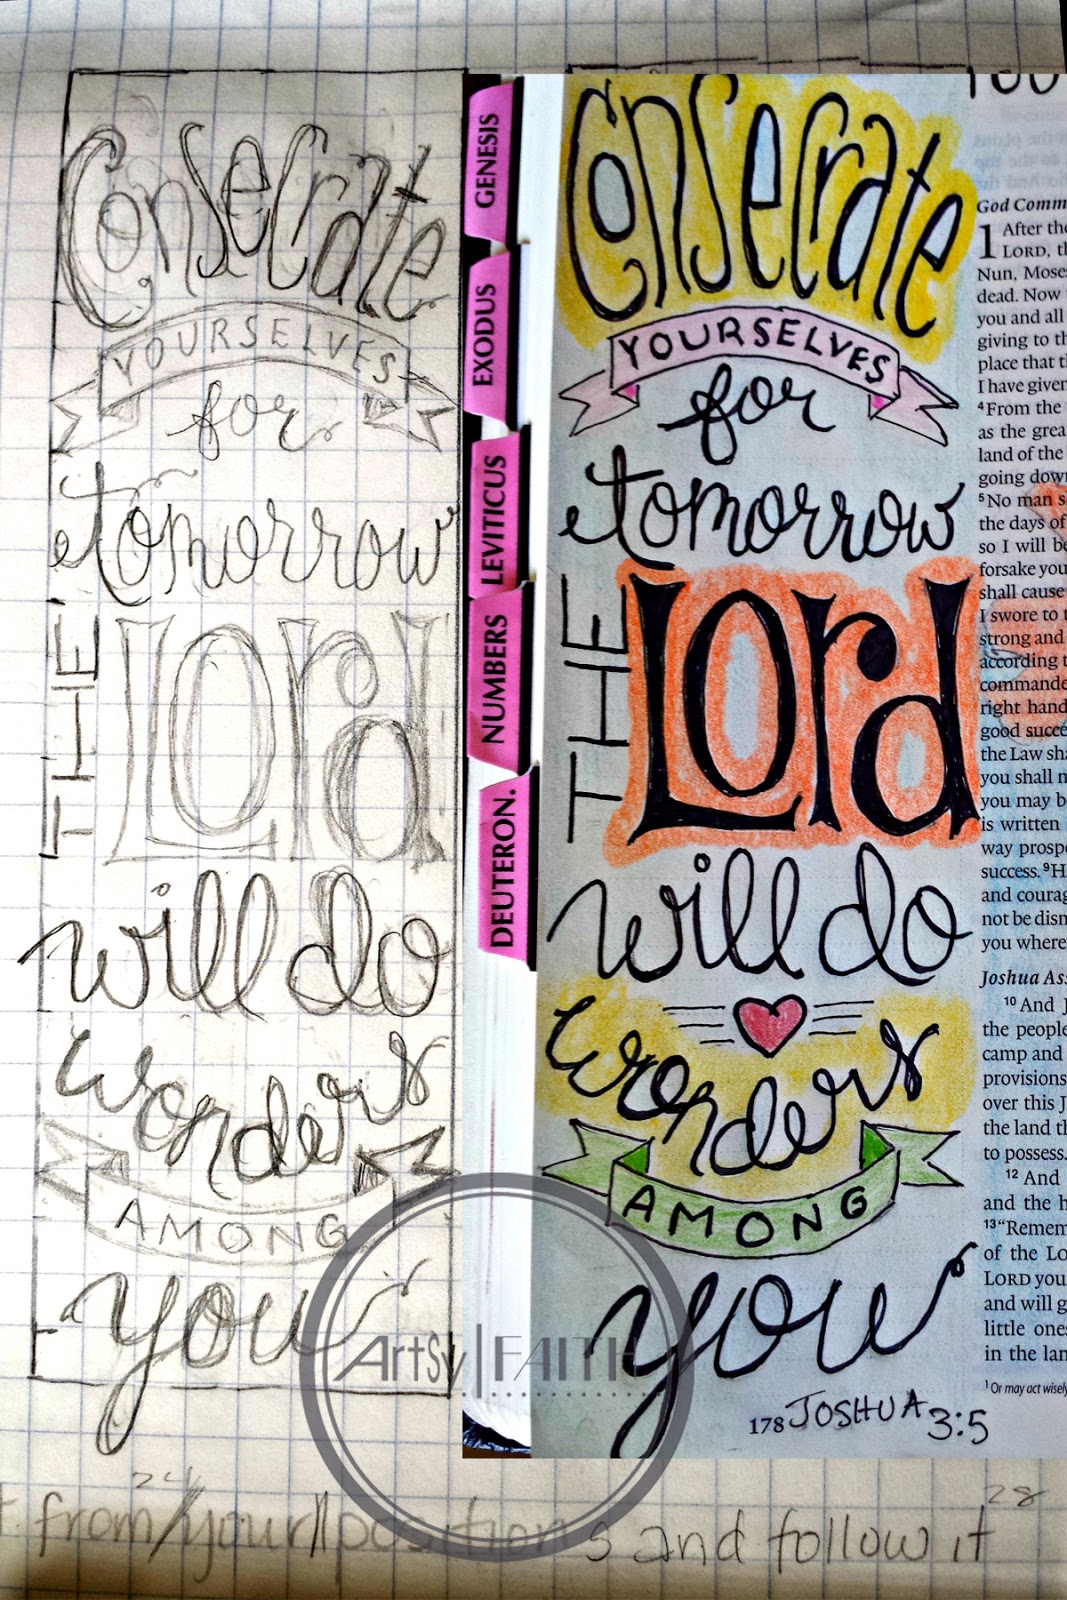
Here is a side by side look at a verse. The
picture on the left is the sketch on graph paper and the one on the right is
the finished verse in my Bible.
I am not sure if it shows
up well in the picture, but if you look closely at the “consecrate” on the
graph paper, you might see 7 or 8 attempts erased while trying to get the
letters to fit on my 2” margin.
Using
different fonts
·
One way to learn how to do hand
lettering is by looking a different fonts. www.dafont.com
offers a ton of free fonts for you to download.
·
Look at different fonts for inspiration
for you to use in your own hand lettering.
·
If you find a font you think you can
use, print it out by typing the alphabet in a word document.
This font is called Broadway. Open a word doc and type as follows:
ABCDEFGHIJKLMNOPQRSTUVWXYZ
abcdefghijklmnopqrstuvwxyz
1234567890,.”( )
The quick brown fox jumps over the lazy dog 456 times.
Be sure to keep your font size the same so you
will see the proportion between the upper and lower case letters. Print the
document to use when you are hand lettering.
This
week’s assignment:
- Start searching for examples you love.
- Create a pinboard on pinterest. It is an easy way to keep your inspiration in one spot.
- Begin to practice your hand lettering.
- Start thinking about verses you want to create in your own Bible. These should be verses that are meaningful to you and/or verses you want to commit to memory.
- Explore fonts and save a few to use for inspiration.
- Print off a few font inspiration sheets using the example on the previous page.
- Purchase your additional supplies, including graph paper if you want to use it to sketch before you draw in your Bible.
- Sketch out a verse (or two) on scratch or graph paper.
·
Above all, have fun and use this as
a way to praise and worship. If you keep Jesus in mind while you explore this,
you will find great joy in the process.
Lastly, remember this Bible of yours has 1066
pages. You will have a wonderful opportunity to fill it up over time. Not every
verse you do will be your favorite, but you will love them all because they are
the word of God! Beautiful verses filled with everything we need to live a life
full of joy!
Week Two
Since our last class you should have done the
following to be prepared for this week’s lesson:
- Sketched out a verse or two in pencil on graph or scratch paper.
- Collected some inspiration from pinterest or google images.
- Downloaded and printed some fonts for you to use in your hand lettering.
- Practice the different hand lettering in the week one handout.
For
week two we want to transfer our sketch into our Bibles using a ruler, pencil,
and white eraser.


I
like to measure each line of my sketch and transfer that to my Bible margin. I like
to start with the center and work up and down. The reason for this is that by
starting in the center I can make adjustments as needed and I am able to
balance the finished work.

Once
I have the sketch the way I like it, I will slowly go over the sketch with 005
micron pen. I use this very fine point because I don’t have the steadiest of
hands. I tend to get a bit nervous at this step and I almost ALWAYS make a
mistake. I use this very fine pen because my mistakes will be small and fine
and easy to cover up as I increase the weight of each letter. Sometimes my
errors will dictate what the final letter style will end up looking like.

Once
I have gone over my letters with the 005 micron pen, I will go back over the
letters adding weight and fixing errors.
Next
step is to erase the pencil markings* and go over any missed spots with a 03
micron pen. Any letter that needed a thicker line or any missed spots are
filled in at this time.
*It is important to wait a
minute to ensure the ink is dry before you erase the pencil markings. Erasing
too soon will smear the ink

The above picture is colored
but you can see the difference in the black lines. The ones in the finished
work are thicker. Some of that is by design some of it is to cover up mistakes J
This
week’s assignment:
- Sketch your verse into your Bible
- Follow the step-by-step instructions for finishing your verse with micron pens
- Repeat the process and complete two verses from start to finish –sketch on graph paper, transfer sketch to Bible, go over with 005 micron pen, add weight and cover up any mistakes, erase pencil marks, and go over with 03 micron pen to finish
- Start thinking about verses you want to create in the next lesson
- Our next lesson we will build upon what we have learned and add color to our verses.
- Continue to look for and save inspiration.
- Find a new font you want to use and download it and print it out (as explained in last week’s lesson)
- Above all, have fun and use this as a way to praise and worship. If you keep Jesus in mind while you explore this, you will find great joy in the process.
Lastly, remember this Bible of yours has 1066
pages. You will have a wonderful opportunity to fill it up over time. Not every
verse you do will be your favorite, but you will love them all because they are
the word of God! Beautiful verses filled with everything we need to live a life
full of joy!
Week Three
Since our last class you should have done the
following to be prepared for this week’s lesson:
- Sketch your verse into your Bible
- Follow the step-by-step instructions for finishing your verse with micron pens
- Repeat the process and complete two verses from start to finish –sketch on graph paper, transfer sketch to Bible, go over with 005 micron pen, add weight and cover up any mistakes, erase pencil marks, and go over with 03 micron pen to finish
- Start thinking about verses you want to create in the next lesson
- Continue to look for and save inspiration.
- Find a new font you want to use and download it and print it out (as explained in last week’s lesson)
In week
three we are going to learn to add color to our verses in our Bibles. Before we
learn about adding color to our verses I would like to share with you how I
draw a wordy verse.
This is the process I use.
You may find a different way that works for you- that is great. I want to share
what I do to help those that are struggling with this.
- write out the verse on graph paper
- circle the words you want to emphasize
- use a line to break up the verse into sections – each section will get a text box on the sketch

·
sketch
each section into the corresponding text box


I I like to measure each line of my sketch and transfer that to my Bible margin. In the example below (using a different
example than the one above) you can see
that I kept my text box measurements the same in the sketch and in the end
design in my Bible but I ended up changing the font styles used.


Once
I have the sketch the way I like it, I will slowly go over the sketch with 005
micron pen. I use this very fine point because I don’t have the steadiest of
hands. I tend to get a bit nervous at this step and I almost ALWAYS make a
mistake. I use this very fine pen because my mistakes will be small and fine
and easy to cover up as I increase the weight of each letter. Sometimes my
errors will dictate what the final letter style will end up looking like. Once
I have gone over my letters with the 005 micron pen, I will go back over the
letters adding weight and fixing errors.
Next
step is to erase the pencil markings* and go over any missed spots with a 03
micron pen. Any letter that needed a thicker line or any missed spots are
filled in at this time.
*It
is important to wait a minute to ensure the ink is dry before you erase the
pencil markings. Erasing too soon will smear the ink.


Coloring
your verse with colored pencils

Stippling - Stippling uses tiny dots
to put color on an image. The placement of the dots will determine the end
result. Many dots placed close together will produce a darker deeper color and
is used in shading. Fewer dots spaced further apart will produce lighter color
and is used for lighter coloring. Practice stippling by drawing dots that are
close together and also by drawing dots that have more distance between them.
Also, notice the difference between dots made when the pencil is sharp vs. when
the pencil point is dull. Stippling is a great way to add some interesting
texture to a drawing.
Hatching - Hatching uses a repetition
of parallel lines. The lines all go in the same direction. The lines can be
close together, far apart, or any variation in between. The pencil is lifted
from the paper after each line and then placed down again to create a new line.
Cross-Hatching - Cross-hatching is similar
to hatching. Once hatching has been done, repeat the process going over the
hatching but in the opposite direction –creating an x pattern. This is a great
way to create shading in a drawing. Cross-hatching can create interesting
textures.
Back and Forth
Stroke - The
back and forth stroke is probably the most common of all the colored pencil
techniques. This is probably how most of us colored as children and still do
today. Basically, you just put your pencil on the paper and draw in a
continuous back and forth motion, without lifting your pencil off of the paper.
This is a good way to fill different areas of your drawing with a lot of solid
color. The end result can vary depending on the point of your pencil. A sharp
point gives noticeable lines in the stroke. A softer point will result in a
smooth finish.
Scumbling - Scumbling is another
technique you probably used as a kid without even knowing that it had a name!
Scumbling involves making continuous circular marks on your paper, without
lifting your pencil. This is another good way to fill in different areas with
lots of color. It can also be used to add interest and texture to a finished
image.
The image below uses several
of the techniques in one project:

This
week’s assignment:
- Sketch your verse into your Bible
- Follow the step-by-step instructions for finishing your verse with micron pens
- Use your colored pencils to add color to your verse. Try one or more coloring techniques.
- Continue to look for and save inspiration.
- Find a new font you want to use and download it and print it out (as explained in last week’s lesson)
- Above all, have fun and use this as a way to praise and worship. If you keep Jesus in mind while you explore this, you will find great joy in the process.
Next class we will layer color using colored
pencils.
Lastly, remember this Bible of yours has 1066
pages. You will have a wonderful opportunity to fill it up over time. Not every
verse you do will be your favorite, but you will love them all because they are
the word of God! Beautiful verses filled with everything we need to live a life
full of joy!
Week Four
Since our last class you should have done the
following to be prepared for this week’s lesson:
- Sketch your verse into your Bible
- Follow the step-by-step instructions for finishing your verse with micron pens
- Use your colored pencils to add color to your verse. Try one or more coloring techniques.
- Continue to look for and save inspiration.
- Find a new font you want to use and download it and print it out (as explained in last week’s lesson)
Last lesson, in addition to learning some
coloring techniques, I shared with you the way I tackle a wordy verse.
Hopefully, at this point you are confident in your ability to tackle any verse
that speaks to you. This lesson we will combine some of the coloring techniques
to learn about layering color to create depth and shape.


All three of the above are examples of layered
coloring. We will go through each one and use different techniques to achieve
the same effects.
Example 1:
1.
Using the back and forth method and
not lifting my sky blue pencil from the paper, lay down a light layer of color.
Add a bit more to the edges –the center should be lightest.
2.
Using the light blue pencil and scumbling
(circular motion) add another layer of color to the outer edges.
3.
Repeat the process from #2 using
your blue colored pencil, but add a bit less. We are trying to get a gradual
layer of color from lightest to darkest the progression should be visible but
not so obvious.
4.
Repeat the process from #2 (and #3)
using your gray colored pencil –this time only adding very little to the outer
edges. This will help create depth.
5.
I like to finish by going over the
entire thing with the lightest color used (sky blue pencil) being careful to
keep the center light. By doing this it helps blend all the layers of color
together. See example below:

The beehive uses the same technique we practiced
above.
1.
Start in the center of each section
with yellow pencil. I use the back & forth coloring method when putting
down the first layer of color.
2.
Use Golden Yellow to add a little
more color moving to the edges. There will be an overlap of color but be
careful not to fully cover the yellow laid down in step 1. I use a circular
motion for this step.
3.
Use Orange lightly in the areas that
would have shadow.
4.
Use light brown over the orange.
5.
Use brown just along the lines of
the drawing to add depth.
6.
Go over the entire image with yellow
to blend and bring the colors together.

The last coloring exercise we will do will cover
shape and detail. We will use the jester hat to learn some shading and detail
work.
1.
Let us focus on just two parts of
the jester’s hat –the stripes and dots parts. Starting with aqua green and
orange color the stripes on the hat leaving some parts uncolored. This
uncolored part will be the highlight area. (I have colored the whole hat but I
want you to focus on just a little bit to start. You can come back and repeat
the worksheet coloring the entire hat.)
2.
Go over the area again with the same
colors but do not cover the whole area colored in step one. It should look like
a gradation of color when you are finished with step 2.
3.
Using the gray pencil color just a
tiny bit around the edges or any place a shadow would appear.
4.
Go back over the entire picture with
the original colors used in step one. This will blend all the shading and give
it dimension. You may need to use just a
bit of black colored pencil to define the inside of the hat.

This
week’s assignment:
- Find a new verse and complete it from start to finish –sketch in pencil, outline with 005 pigma micron pen, erase your pencil lines, add weight to letters with a 03 pigma micron pen, and add color using one or more of the techniques learned in this lesson.
- Continue to look for (pin on pinterest) Bible Art Journaling examples and save for inspiration.
- Work on drawing a new font.
- Try a new coloring technique
- Above all, have fun and use this as a way to praise and worship. If you keep Jesus in mind while you explore this, you will find great joy in the process.
Next class we will use watercolor to add color
to our verses.
Lastly, remember this Bible of yours has 1066
pages. You will have a wonderful opportunity to fill it up over time. Not every
verse you do will be your favorite, but you will love them all because they are
the word of God! Beautiful verses filled with everything we need to live a life
full of joy!
Week Five
Since our last class you should have done the
following to be prepared for this week’s lesson:
- Found a new verse and complete it from start to finish –sketch in pencil, outline with 005 pigma micron pen, erase your pencil lines, add weight to letters with a 03 pigma micron pen, and add color using one or more of the techniques learned in lesson 4.
- Continue to look for (pin on pinterest) Bible Art Journaling examples and save for inspiration.
- Work on drawing a new font.
- Practice the coloring techniques learned in lessons 3 & 4.
At this point in the class my hope is that you
are now getting comfortable drawing letters and sketching out a verse. If you
haven’t used colored pencils a lot it may take some practice for you to feel
comfortable with the medium. Please continue to experiment with adding color to
your verses. These last two lessons we will add color by using watercolor paint
and inking. Know that by using watercolor paint your page will be wet and therefore
when it dries it will change the texture of your page. If this sort of thing
bothers you, you may not want to watercolor in your Bible.
The first thing I do before water coloring is to
protect the pages under the page I will be painting. I do this by using a piece
of waxed paper under the page I am painting.

Once you have your waxed paper in place you will
want to gather your supplies before you begin: Paint, paint brush or brushes, a
cup of water (to clean your brush), and paper towel. I like to use paper towel
to blot away any excess water or paint on the page.

The trick to using watercolor on these thin
Bible pages is to figure out how much water to use. This is something you learn
by “feel”. If you have too much water, it is hard to control. Not enough water
and the color won’t spread well.


This really will be something you need to learn
by doing. If you love the idea of water coloring, practice on regular printer
paper before you use it on your Bible verse. The first few times I used it I
used it to create rays of light. This was a great way to start because it was
simple and defined use of paint.


As you progress in your use of different mediums
(pen, colored pencils, water color) don’t be afraid to mix them to get the overall
desired effect. In the example below I used my micron pen to define the image I
wanted to paint. I used water color to add color to the image but when it dried
the detail had disappeared and I was displeased with it. I went back over the
image with some colored pencils adding detail where I thought it was needed.

This
week’s assignment:
- Find
a new verse and complete it from start to finish –sketch in pencil,
outline with 005 pigma micron pen, erase your pencil lines, add weight to
letters with a 03 pigma micron pen, and add color using one or more of the
techniques learned.
- Continue
to look for Bible Art Journaling examples and save for inspiration.
- Try
a new coloring technique
Next class we will use ink to add color to our
verses. Lastly, remember this Bible of yours has 1066 pages. You will have a
wonderful opportunity to fill it up over time. Not every verse you do will be
your favorite, but you will love them all because they are the word of God!
Beautiful verses filled with everything we need to live a life full of joy!
Week Six
Since our last class you should have done the
following to be prepared for this week’s lesson:
- Find
a new verse and complete it from start to finish –sketch in pencil,
outline with 005 pigma micron pen, erase your pencil lines, add weight to
letters with a 03 pigma micron pen, and add color using one or more of the
techniques learned.
- Continue
to look for Bible Art Journaling examples and save for inspiration.
- Try
a new coloring technique
This week we will use ink pads to
color our verses. We will discuss the difference in using ink for coloring and
stamping in your Bible.
In the example I will show you I
used a stamp, hand lettering, and sponging ink on to color the image.
Additionally I used post-it notes to mask areas of the verse to allow different
colors used to color. I will go through the process step-by-step so let’s get
started.
I am using the verse 2 Timothy 4:17.
On that particular page in my Bible (page 997 in the Crossway ESV Journaling
Bible) there is a large space that I utilized for this verse.
I started by drawing a 3” x 4” box
to place my verse. I placed a line to mark where my stamped “Lord” would be
placed and then I sketched the rest of the verse in pencil. I used my 005 pigma
micron pen to ink in the pencil lines and then I erased the pencil lines.


I then used my 01 pigma micro pen to
add weight to the letters. At this point the verse is finished but I wanted to
add color to it. I wanted to use three different colors. I used Stampin’ Up
Classic Ink pads: Baja Breeze (retired color), Pear Pizzazz, and So
Saffron. In order to do that I needed to
mask off the area I didn’t want colored. I used post-it notes to mask the
areas.


After masking, I used a wedge of
sponge and an ink pad (Baja Breeze) and began adding ink to the outside corners
leaving the center portion uninked so I could add the next color. I attempted
to follow the 60-30-10 design rule and used mostly Baja Breeze, then Pear
Pizzazz with just a touch of So Saffron.


I
took a picture of the next page to show you the bleed through of the ink. I
have found that sponging leaves no bleed through but stamping does. For the
stamped “Lord” I used Memento Tuxedo Black. As a last touch I used my Stampin’
Up So Saffron Marker brush tip and added just a few shadow details on the
banner.


I
did one other verse in the same way except in addition to sponging the main
area; I used an aquapainter (waterbrush) and a blender pen to add a touch of
color. What I found was that the aquapainter didn’t bleed through in small
areas, but if used in a larger area, it bleeds. I didn’t have any bleeding with
the blender pen, but it wasn’t used in a large area.


The heart in “heartily” was done
with a blender pen, all the other hearts were colored with an aquapainter.
This brings Bible Art Journaling 101
to a close. My hope is that you have learned some hand lettering techniques,
and coloring with colored pencils, watercolor paints, and inks.
There are a ton of products and
materials you can use in Bible Art Journaling. My goal was to show you that it
doesn’t require a lot of materials. You could get a lot of bang for your buck
by limiting your supplies and finding creative ways to use them.
I thank each one of you for allowing
me to share this faith art with you. It has blessed me in many ways. I pray
that as you progress in your own Bible Art Journaling you will find great joy
in this creative form of worship!
Thank you so much for posting this!! I just got my journaling Bible and will use this class to get started. Have a very blessed day. :-D
ReplyDeleteJulia Cat Nut, you are very welcome! I am so excited for you. Bible Art Journaling has been such a blessing to me and I am sure you will feel the same as you begin this experience. Please feel free to share your pages on my facebook page.
DeleteThank you so much!
ReplyDeleteYou are welcome. There are also videos that may help if you need to see the whole process. I am a visual learner :-)
DeleteI just ran across your site and I am so excited. This is by far the most detailed instructions on Bible journaling I have found!
ReplyDeleteI am a beginner and I just want to thank you for your effort to help. I intend to order your stamps next month! Thank you so much.
You are very welcome! I am glad you are finding the information helpful. Be blessed and enjoy your time in the Word!
DeleteHi Ms. Robertson,
ReplyDeleteMy name is Megan Lloyd and I am very much interested in your artwork. You are so creative and artist. Your color schemes is what drew me to your pictures. They are so calming and peaceful to look at. Do you sell your artwork at all? I would love to frame one!
Hi Ms. Robertson,
ReplyDeleteMy name is Megan Lloyd and I am very much interested in your artwork. You are so creative and artist. Your color schemes is what drew me to your pictures. They are so calming and peaceful to look at. Do you sell your artwork at all? I would love to frame one!
Joanie - I'm ready to start my bible journalling journey. Your online class is just what I needed to get started. Thank you. Love you.
ReplyDelete